
Push-Up Progression: Choose an Incline and Build Toward the Floor
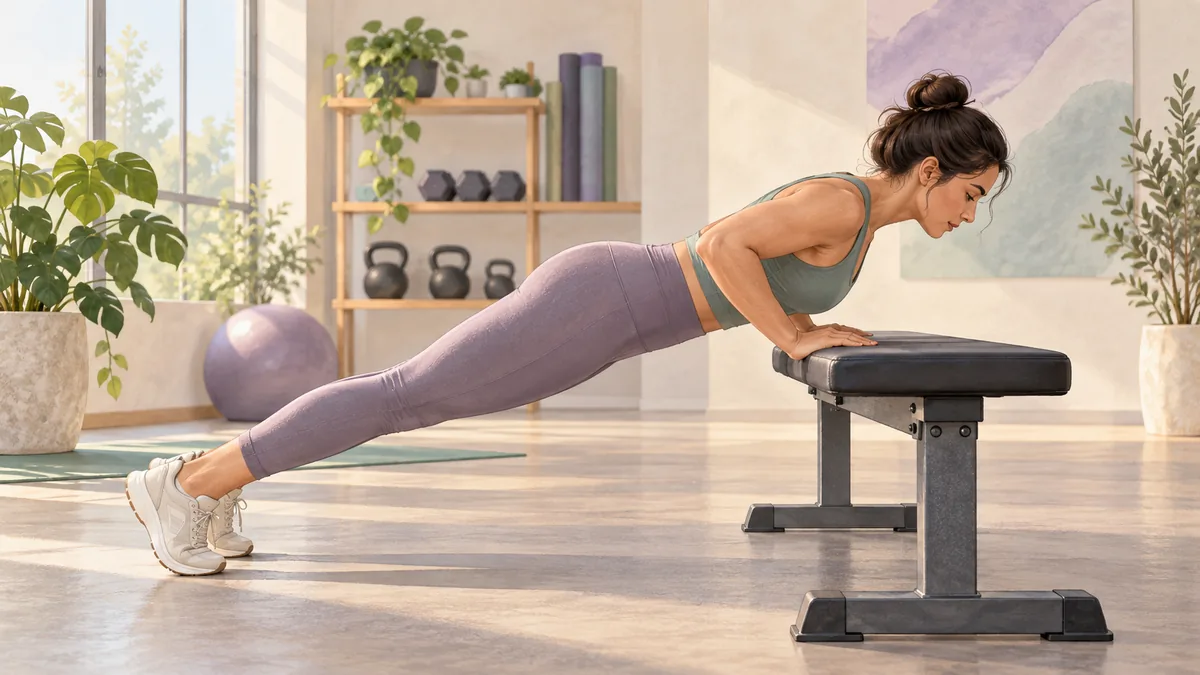
An incline push-up lets you practise pressing while keeping your body supported in a straight line. Raising the hands generally reduces the challenge; lowering them can make it harder. The useful starting height is the one you can control today, not a named piece of furniture.
This guide offers practice options for generally healthy adults. A repetition target is an example for organizing training, not a validated test of readiness for floor push-ups.
Pick a support that will stay put
Use a wall or a fixed exercise surface designed to withstand the force you apply. Avoid rolling chairs, folding tables, unstable benches, and anything that could tip. A staircase can also leave little space for the face and hands; do not assume every step is a suitable workout station.
Start at a high support and try a few easy repetitions after your warm-up. If you cannot lower and return smoothly while breathing, increase the height. Height alone does not determine difficulty: body proportions, foot placement and depth matter too.
Set up a repeatable repetition
- Put your hands slightly wider than shoulder width on the support.
- Walk your feet back into a comfortable straight body position.
- Bend your elbows back at a comfortable angle rather than flaring them straight sideways.
- Lower only as far as you can control without pain or losing your body line.
- Press back up without snapping your elbows into hyperextension.
Keep your neck in line with your torso. There is no need to touch your face to the surface or force a fixed elbow angle. Record the support height and foot position so that next session’s repetitions mean roughly the same thing.
Start with a small dose
A possible first session is one or two sets of 4–8 controlled repetitions, with enough rest to recover your breathing and technique. Stop before grinding or collapsing. Fit this into two non-consecutive strength sessions initially, rather than adding it on top of a full pressing workout.
Mayo Clinic’s strength guidance supports adjusting resistance as an exercise becomes easier and allowing recovery between sessions for the same muscles. It does not prescribe the incline heights or targets in this article.
Lower the support without chasing a deadline
Repeat the same setup across several sessions. If the repetitions remain smooth and recovery is manageable, add a repetition to a set. Later try a slightly lower fixed support, using fewer repetitions again. Change one thing at a time.
For example, a hypothetical reader can perform two sets of eight at a high bench. At a lower bench they manage only four controlled repetitions before their hips sag. They can return to the higher bench for the rest of the session, or keep a very small amount at the lower height. Neither result predicts when they will reach the floor.
Slow lowering is optional, and counts as extra work. Do not add a large volume of negatives just because the full repetition is not available yet.
What to change when a repetition feels wrong
| Observation | First adjustment |
|---|---|
| Hips sag or head reaches forward | Raise the support and reduce repetitions |
| Only a very small depth is controlled | Practise that depth, then increase it gradually |
| Support moves or hands slip | Stop and fix the equipment setup |
| Wrist or shoulder pain | Stop the painful exercise; seek assessment if persistent or concerning |
Knee push-ups are another option when comfortable. They change the lever and do not require you to achieve a particular incline standard first. Purpose-built non-slip push-up handles may change wrist position, but they are not a treatment for wrist pain; avoid dumbbells that can roll.
Try the floor when it is manageable
An occasional floor attempt can help you assess the difference, but end it if your body line collapses. A single controlled repetition is useful information. Return to your incline for the remaining work rather than repeatedly failing.
Log variation, repetitions, rest, and comfort. Read progressive overload for further options and include suitable pulling work in your overall plan.
Sources and further reading
These resources support the topics noted below. The practice routine and progression checkpoints are Ko Myat examples, not programs endorsed by these sources.
- Mayo Clinic: Strength Training — General resistance selection and recovery guidance; not validation of skill checkpoints.
- ACSM: 2026 Resistance Training Guidelines — Healthy-adult resistance training, individualization, and home-based options; not a gymnastics protocol.
More Fitness guides
Beginner Bodyweight Workout: An Adjustable Home Strength Plan
Start a bodyweight strength routine with manageable sets, easier variations, equipment checks, and a log that helps you decide when to progress.
· 3 min read

How Many Rest Days Do You Need? A Practical Guide to Recovery
How to plan rest days for bodyweight, gymnastics, and flexibility training, what active recovery looks like, and the warning signs that you need more rest.
· 3 min read
Muscle Soreness After a Workout: Should You Train Through It?
Understand delayed soreness, recognize symptoms that need medical care, and adjust activity without treating an online checklist as a diagnosis.
· 3 min read